A proxy can pass a blacklist check and still fail when you use it. To learn how to check if a proxy is blacklisted, submit its IP address or hostname to an IP blacklist checker, then review the results from the reputation sources it queries. A listed result means at least one source returned a hit. A clean result reflects only the sources checked.
If you’re checking a proxy before using it, reputation is one useful signal, not a complete performance test. DNS-based blackhole lists and other reputation databases may flag proxy IPs associated with spam activity. The checker itself does not test speed, authentication, uptime, or compatibility with a particular site.
This guide explains what an IP Blacklist Checker reports, how DNSBL checks work, and how to interpret listings and warnings. You’ll also learn how a blacklist check differs from a proxy health test, so you can choose the right next step for the issue you’re diagnosing.
Key Takeaways
- Use an IP reputation checker to see whether selected blacklist sources report a hit for the proxy address.
- Review which sources returned a listing or warning before deciding whether the result matters for your use case.
- Pair reputation checks with separate tests for speed, authentication, uptime, and compatibility.
- Learn how hostname resolution and DNSBL lookups shape the results, and what to do with them.
Table of Contents
- DNSBLs, RBLs, and reputation databases
- What is IP Blacklist Checker?
- Blacklist checks versus proxy health testing
- How do I check a proxy against DNS-based blackhole (DNSBL) lists?
- Anosim: SMS Activation
DNSBLs, RBLs, and reputation databases
Knowing how to check if a proxy is blacklisted starts with its public IP. Submit the address to an IP blacklist checker that queries DNSBLs and reputation databases. Review any email-related listings individually. A hit means one queried source reports the address, not that every mail server blocks it.
DNSBL means DNS-based blacklist, while RBL means real-time blacklist. Both terms describe systems that publish IP reputation data for lookup. A checker compares the proxy IP with selected lists, each of which has its own scope and criteria. A listing may relate to spam activity associated with that IP.
These records matter because proxy addresses can carry histories beyond your session. A proxy or VPN can mask your own IP, but databases may still identify proxy IPs associated with spam activity. For example, a proxy address may appear on a list even when your current task sends no email. The result describes the IP’s listing status, not your intent.
For an email-sending reputation check, follow these steps:
- Submit the proxy’s public IP to a checker that queries DNSBLs.
- Review each result and note the name of every listing source.
- Separate email-spam listings from other reputation results.
- Use the source details to understand what the reported hit concerns.
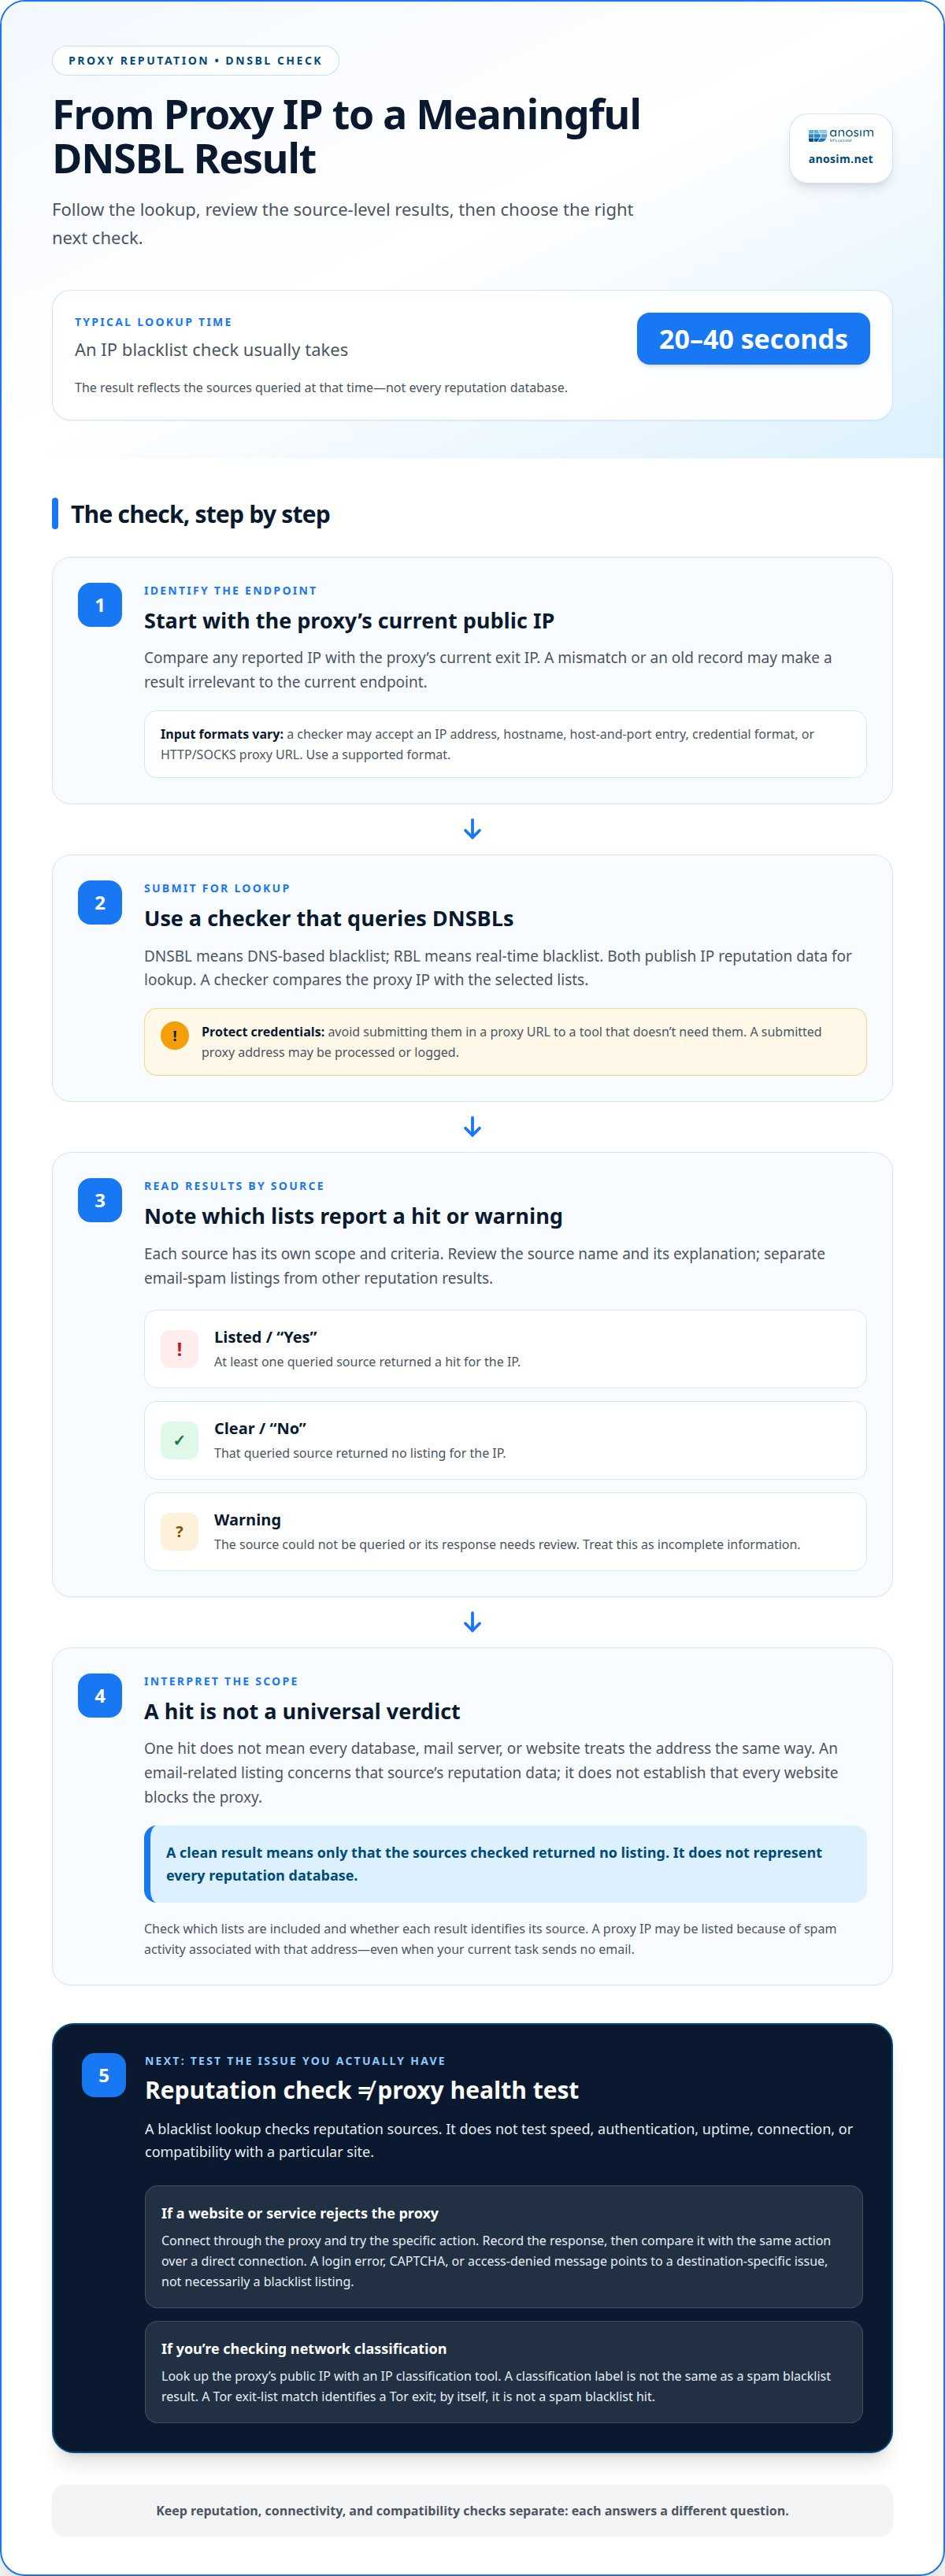
An IP blacklist check usually takes 20 to 40 seconds. That result reflects the sources queried at that time. It doesn’t show the proxy’s speed, authentication status, uptime, or compatibility with a mail service. Treat those as separate technical checks.
If a result is listed, inspect the source before assigning that IP to an important account or production task. A listing is a reason to review the proxy’s reputation, not proof that every destination will reject it. If the checker shows a warning, review that source’s response separately to distinguish a reported listing from a lookup that needs further attention.
What is IP Blacklist Checker?
An IP Blacklist Checker queries selected reputation sources and reports a result for each. “Yes” means at least one source returned a hit for the proxy IP. “No” means that source returned no listing. Read each result separately: one hit doesn’t mean every database or destination treats the address the same way.
Check the source name beside each result before deciding what it means. For example, a hit on an email-related list concerns that source’s reputation data. It doesn’t establish that every website blocks the proxy. The checker reports what its selected sources return, not a universal verdict on the address.
To assess a possible false positive or outdated listing, compare the reported IP with the proxy’s current exit IP. Then review the listing source and its explanation. A mismatch or old record may make the result irrelevant to the current endpoint.
A warning differs from both “Yes” and “No.” It means a source couldn’t be queried or returned a response that needs review. Treat it as incomplete information, not proof that the IP is listed or clear.
- Listed: At least one queried source returned a hit.
- Clear: The queried source returned no listing for that IP.
- Warning: The source’s response needs review.
Free proxy blacklist checkers can provide a quick scan, but their coverage depends on the sources they query. Check which lists are included and whether the results identify each source. A short report with limited coverage can’t represent every reputation database.
Input format matters, too. Checkers may accept an IP address, hostname, host-and-port entry, credential format, or HTTP or SOCKS proxy URL. Use a supported format, and don’t share proxy credentials with a tool that doesn’t need them. A clean result describes only the queried reputation sources.
Blacklist checks versus proxy health testing
A blacklist check and a health test answer different questions. The first checks reputation sources for an IP listing. The second tests whether a proxy connects and works for a particular task. A clean reputation result doesn’t prove the proxy is fast, available, authenticated, or compatible with a website.
To test whether a website or service blocks a proxy IP, connect through the proxy and try the specific action you need. Record the response, then compare it with the same action over a direct connection. A login error, CAPTCHA, or access-denied message points to a destination-specific issue, not necessarily a blacklist listing.
To check VPN, hosting, or datacenter detection, look up the proxy’s public IP with an IP classification tool. Compare its reported network category with the service’s response. Classification labels describe how an address is categorized, not whether it appears on a spam blacklist. A site can also apply its own access rules.
- Reputation: Does a queried source report the IP?
- Connectivity: Does the proxy establish a connection?
- Compatibility: Does the target service accept the request?
Keep the tests separate. If the proxy connects but a service rejects it, repeat the request and note the exact error. If the same service works through another connection, the proxy’s IP category or the destination’s rules may explain the difference. Neither test alone identifies every possible cause.
A blacklist check can expose information to the checker. It can see the public IP used to connect, and a submitted proxy address may also be processed or logged. If you access the checker directly, it sees your direct connection’s public IP. Avoid submitting credentials in a proxy URL.
One special result needs careful interpretation: a Tor exit-list match identifies an IP as a Tor exit. It isn’t, by itself, a spam blacklist hit. Treat it as a network classification, not evidence of email abuse.
How do I check a proxy against DNS-based blackhole (DNSBL) lists?
Start with the proxy’s current endpoint. If you enter a hostname, the checker resolves it to a public IPv4 address before querying selected reputation databases. A hostname can point to a different address later, so confirm the resolved IP matches the proxy connection you intend to assess.
For a direct IP input, use the proxy’s public IPv4 address. Don’t substitute your device’s local network address. The DNSBL lookup checks the submitted endpoint against its selected lists, not every reputation database that exists. Results therefore depend on both the correct IP and the sources queried.
Follow this sequence:
- Identify the proxy’s current public IP or hostname from its connection details.
- Enter the endpoint in the checker’s supported format.
- Allow the hostname to resolve, if you supplied one.
- Review each DNSBL result and note its source and status.
- Compare any reported IP with the proxy’s current endpoint.
For example, if a hostname resolves to one IPv4 address but your proxy session exits through another, the lookup may describe the wrong endpoint. Check the resolved address against the IP shown by a separate connection test. A mismatch calls for a corrected lookup, not an assumption about the proxy’s reputation.
Interpret each source separately. A hit means that particular database returned a listing for the checked IP. A clear result means it returned no listing. A warning means the response needs review or the source couldn’t be queried. Don’t treat a warning as either a confirmed hit or a clean result.
Keep a record of the checked IP, hostname, source names, and results. This makes repeat checks comparable if the proxy endpoint changes. A checker may finish in 20 to 40 seconds, but that timing doesn’t expand its source coverage. For a high-impact account or production task, review listed sources before assigning the endpoint. If the underlying issue is fixed, most IP addresses are removed from blacklists within 1 to 3 days.
Anosim: SMS Activation
Anosim offers SMS Activation and Rent Number services for receiving verification codes. A blacklist checker assesses a proxy IP’s reputation; it doesn’t provide a number for account verification. If your next task involves receiving a code, these services address a different part of the workflow.
Choose a service based on your task: use SMS Activation for verification or Rent Number when you need a virtual number. Anosim also offers Rent Service and Rent Mobile VoIP. These options support digital communication separately from proxy reputation testing, so select the service that fits your intended use.
For verification services, visit Anosim’s website to explore the available options.
Make your next proxy decision deliberately
Before assigning an IP to a sensitive workflow, decide what evidence your decision requires. The right process for how to check if a proxy is blacklisted depends on the task: reputation information can guide your choice, while actual use reveals whether the proxy suits the destination. Keep these decisions distinct and document your team’s criteria so future assessments remain consistent.
If you’re selecting proxy infrastructure for ongoing online operations, consider how the IP fits your workflow, privacy needs, and target services. Mobile proxies are available from Anosim’s partner proxied.com; Anosim itself offers communication services, including Rent Service and Rent Number. Choose the option that matches the job rather than treating a reputation result as a complete assessment of proxy suitability.
Contact proxied.com to discuss your proxy requirements and identify a practical next step for your workflow. A clear process helps you make informed decisions with confidence.
Frequently Asked Questions
Can a clean blacklist result still be a bad proxy?
Yes. A clean reputation result doesn’t confirm that the proxy works with your setup. For example, it might reject your credentials, fail to connect, or provide an exit location unsuitable for a service. Diagnose the specific failure: verify the proxy configuration, then test the exact application or workflow. Treat reputation and usability as separate checks.
Does using a VPN or proxy server help bypass IP blacklisting?
A VPN or proxy can route a connection through a different IP, but that address may also be listed or restricted. A website can apply its own access controls to connections it considers unusual. If you’re troubleshooting a legitimate access issue, identify whether the restriction concerns the IP, account, or requested action before changing network routes.
How Do IP Blacklists Work?
IP blacklists store address reputation records that receiving systems can consult when assessing traffic. List operators apply their own criteria and may publish an address after detecting activity they consider abusive. For example, a mail server can query a relevant list while evaluating a message. Because each operator maintains separate records, a listing on one database doesn’t establish a listing on another.
How to Get Your IP/Domain Delisted from Blacklists?
First, identify the exact IP address or domain and the listing source. Follow that source’s removal process and address the activity associated with the record before submitting a request. If you don’t control the proxy’s IP, share the listing details with its operator for investigation. Recheck the same identifier after the source updates its records.
How can I check whether a proxy IP address is blacklisted?
To learn how to check if a proxy is blacklisted, identify the public IP used by the proxy connection. Submit the address to an IP reputation checker, then inspect the results for each source. Keep the IP and result together in your notes. If the proxy endpoint changes, check the new exit address rather than relying on the old result.
Which proxy IP reputation and blacklist lookup tools are reliable?
Choose a checker that identifies the IP it evaluated and names the reputation sources queried. It should distinguish a reported listing from an unavailable or unclear response. For important workflows, compare results from separate tools using the same proxy IP. Differences may reflect varying source coverage, so assess the underlying listing details rather than relying on a single overall label.